OpenLink AI Layer (OPAL) Setup & Installation Guide
A comprehensive guide to installing, configuring, and utilizing the OpenLink AI Layer (OPAL) for advanced AI-driven data integration.

Introduction
OPAL is a powerful add-on layer for Virtuoso that enables the creation, deployment, and use of AI Agents and Agentic workflows. It loosely couples native or external data spaces (databases, knowledge graphs, and filesystems) with a variety of Large Language Models (LLMs).
Benefits
- Universal Accessibility: Exposes OPAL functionality to any application or LLM that understands the OpenAI specification.
- Enhanced Security: Implements robust, attribute-based access controls (ABAC) to ensure data privacy and security at a granular level.
- Simplified Integration: Offers a standardized API that simplifies the process of integrating OPAL's capabilities into new and existing workflows.
- Future-Proof: Aligns with modern development practices and the growing ecosystem of AI tools and services.
Capabilities
OPAL provides access to a wide range functionalities, including:
- Database Operations: Execute SQL queries, manage tables, and retrieve metadata.
- Graph Operations: Interact with graph data, manage named graphs, and perform complex graph-based queries.
- LLM Management: Register, bind, and manage Large Language Models for use within the OPAL ecosystem.
- Administrative Tasks: Perform database administration, manage user access, and configure system settings.
- AI-Powered Data Interaction: Leverage advanced features like
promptCompleteandchatPromptCompletefor sophisticated, context-aware data interactions.
Installation
- Install the latest on premise Virtuoso installer for macOS, Windows, Linux or Linux Nexus Repository
- Install the VAL and personal-assistant VADs via the Conductor or iSQL interfaces
- Goto
https://localhost:8891/chatorhttps://{CNAME}:8891/chat - Log in with the default
dbausername and when prompted, enter your preferred Large Language Model (LLM) provider's API key.
Additional Components
Once your OPAL instance is up and running, you can optionally install additional components using the Virtuoso Application Distribution (VAD) installer—available via the Virtuoso Conductor UI or the isql command-line tool.
Important VAD Package Examples
1. Assistant-Metal UI
A user-friendly interface for interacting with OpenAI's Assistants API. This component enables you to create, test, deploy, and manage AI Agents/Assistants using natural language prompts written in Markdown.
2. Linked Data Cartridges
A powerful suite of data transformation tools that enhance data crawling across local and public HTTP networks (e.g., the Web). These transformations can be triggered by:
- SQL or SPARQL queries
- Briefcase folders
- Virtuoso's built-in web crawler
This package also includes a Meta Cartridge that integrates LLM-based batch processing. For example, given the URL of an HTML document, the system can:
- Trigger a batch task (executed asynchronously by the selected LLM)
- Transform content into RDF-based Knowledge Graphs
- Upload the resulting Knowledge Graph into Virtuoso's native RDF store for Entity Relationship Graphs
These VAD packages significantly expand your OPAL instance's capabilities—enabling advanced data workflows driven by entity relationship types defined in ontologies and enhanced through loosely coupled LLM integrations.
Supported LLMs
Any LLM that provides an API compatible with the OpenAPI specification can be registered and used with the OPAL. This includes popular models from providers like:
- OpenAI — GPT family
- Google — Gemini and Gemma families
- Anthropic — Claude family
- Microsoft — GPT, Grok, and Phi families
- Perplexity — Sonar
- xAI — Grok family
- Mistral — Mistral family
- Alibaba — Qwen family
- DeepSeek — DeepSeek R family
- Meta — Llama family (via Groq or Cerebras)
Note: Other hosted or local LLMs that support OpenAI's Tools API for external function call integration are also supported.
Attribute-based Access Controls (ABAC)
At this point, you need to secure your OPAL and LLM integrated environment by using fine-grained access controls to determine who is allowed to log into your assistant and under what constraints (restrictions). You achieve this by executing the following commands (using the Conductor or ISQL command-line interfaces) that set up these powerful access controls.
Fine-grained access controls use entity relationship graphs comprising relationships, authorizations, restrictions, groups, and agents (people or bots) that are named unambiguously using standardized identifiers (e.g., Internationalized Resource Identifiers [IRIs]) with terms from ontologies such as: W3C's Access Control Ontology, OpenLink Software's Access Control Ontology, OpenLink Software's Restrictions Ontology, and the Friend Of A Friend [FOAF] Ontology.
Login Authorization for /chat endpoint
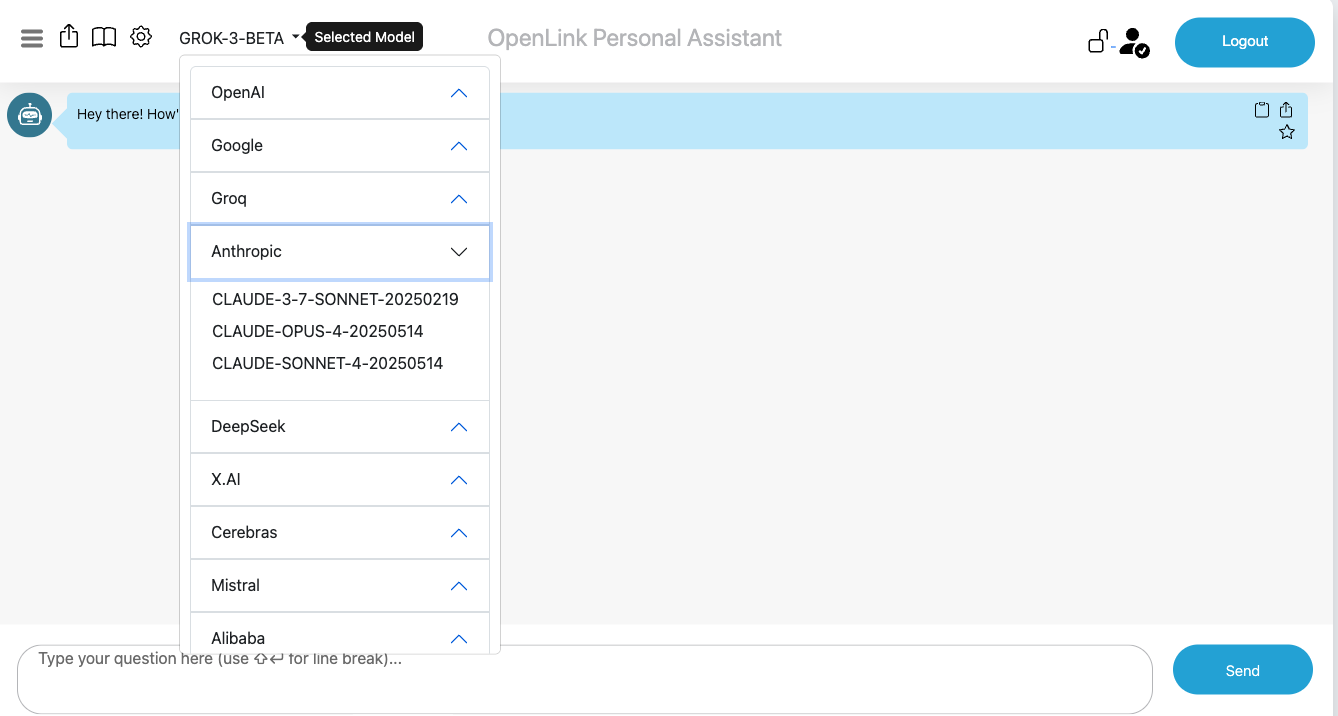
OPAL is denoted by the system identifier urn:oai:chat, which makes it possible to construct an authorization for logins that belong to a designated group or list of users. In this case, we simply want to set the authorization scope to the DBA user denoted by the identifier http://localhost/dataspace/person/dba#this as follows:
-- Grant dba user access to the /chat endpoint
PREFIX acl: <http://www.w3.org/ns/auth/acl#>
WITH <urn:virtuoso:val:default:rules>
INSERT {
  <#rulePublicChat> a acl:Authorization ;
      acl:accessTo <urn:oai:chat> ;
      acl:agent <http://localhost/dataspace/person/dba#this> .
} ;
Login Authorization for /assist-metal endpoint
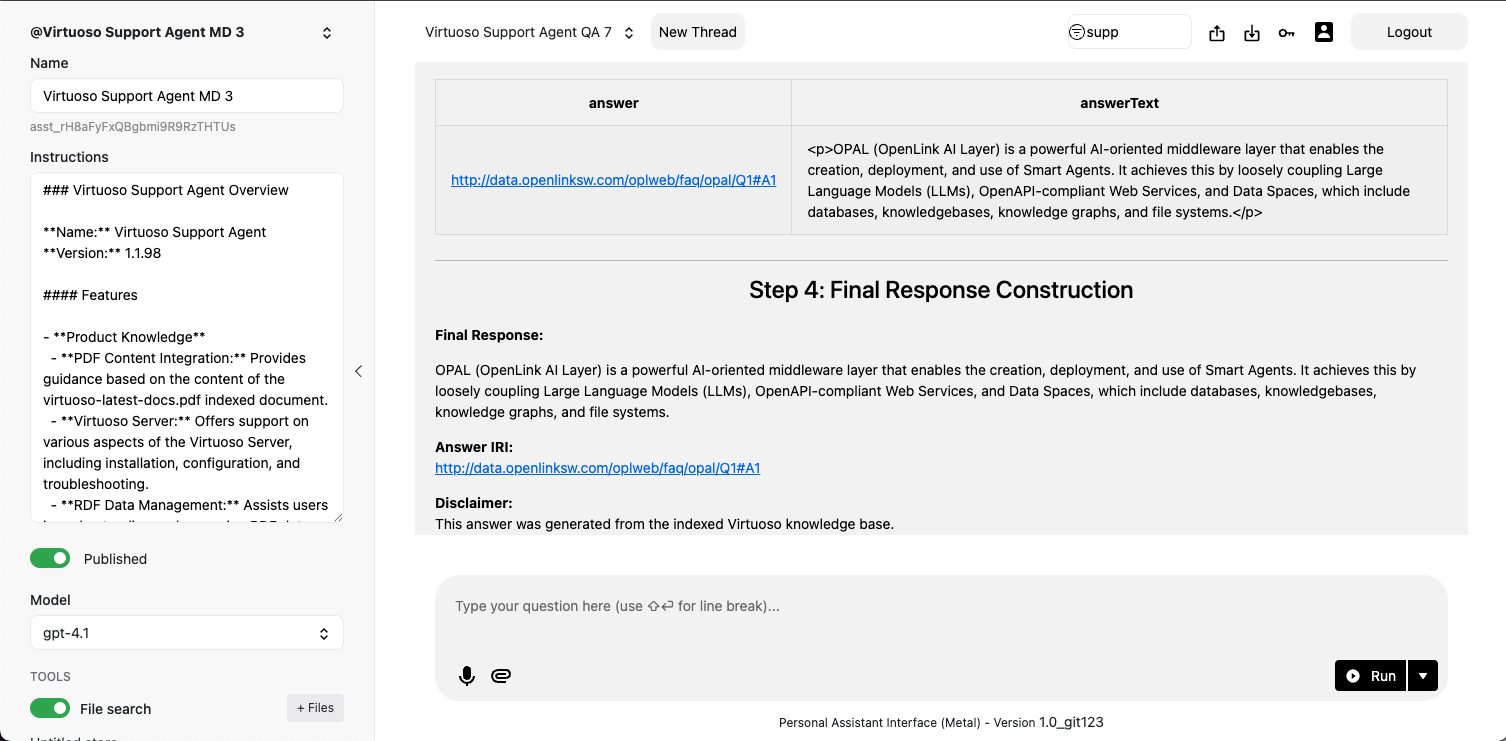
If you want to extend the login access to OPAL's Assistants functionality via its `/assist-metal` endpoint, then execute the following to create a restriction on `urn:oai:assistants` (which is how this functionality realm is denoted):
-- Grant dba user access to the /assist-metal endpoint
PREFIX acl: <http://www.w3.org/ns/auth/acl#>
WITH <urn:virtuoso:val:default:rules>
INSERT {
  <#assistantsAdmin> a acl:Authorization ;
      acl:accessTo <urn:oai:assistants> ;
      acl:agent <http://localhost/dataspace/person/dba#this> .
} ;
System-wide LLM API Key Registration
Rather than repetitively entering LLM API Keys when you log in, it might be preferred to have those keys registered system-wide. To achieve this goal, you need to create a restriction for successfully logged-in users by executing the following:
-- Create a restriction to allow system-wide API keys for the dba user
PREFIX oplres: <http://www.openlinksw.com/ontology/restrictions#>
WITH <urn:virtuoso:val:default:restrictions>
INSERT {
    <#restrictionAuthChatKey> a oplres:Restriction ;
        oplres:hasRestrictedResource <urn:oai:chat> ;
        oplres:hasRestrictedParameter <urn:oai:chat:enable-api-keys> ;
        oplres:hasAgent <http://localhost/dataspace/person/dba#this> ;
        oplres:hasRestrictedValue "true"^^xsd:boolean .
} ;
Large Language Models Registration & Use
To use a Large Language Model with the OPAL, you must first register it. This process involves providing the server with the necessary information to communicate with the LLM's API, including:
- API key or authentication token
- Endpoint URL
- Model name and version
- Supported features and parameters
Bind your OPAL instance to one or more LLMs using the commands below in the Conductor or iSQL interfaces.
Listing Bound LLMs
Command Syntax
OAI.DBA.FILL_CHAT_MODELS('{Api Key}', '{llm-vendor-tag}');Where llm-vendor-tags are as follows: alibaba, claude, deepseek, gemini, groq, mistral, openai, xai.
Usage Examples
OAI.DBA.FILL_CHAT_MODELS('sk-xxxx', 'openai');
OAI.DBA.FILL_CHAT_MODELS('sk-ant-xxx', 'claude');
Google DeepMind's Gemini does not currently offer an API for LLM listing, so you use:
OAI.DBA.REGISTER_CHAT_MODEL('{llm-vendor-tag}','{llm-name}');
Usage Example
OAI.DBA.REGISTER_CHAT_MODEL('gemini','gemini-2.5-flash-preview-05-20');You can view the effects of this command via the Bound LLMs endpoint at:
https://{CNAME}:8891/chat/admin/models.vsp
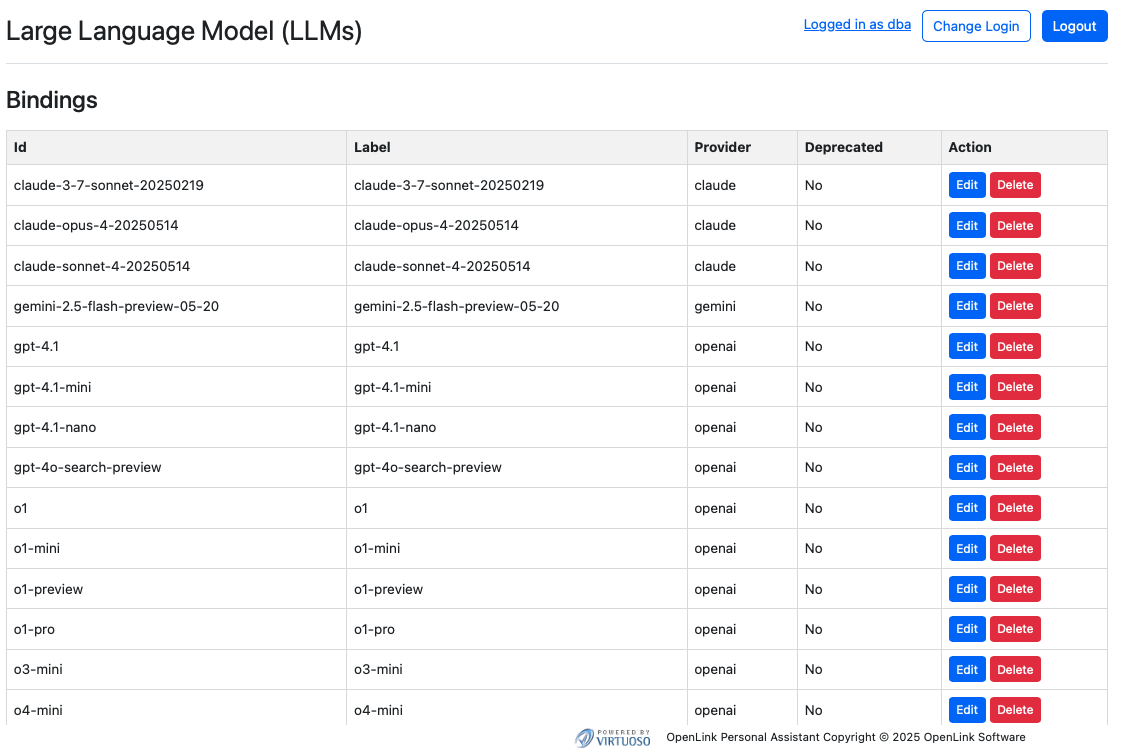
System-Wide LLM API Key Registration
To negate the need to present API Keys for bound LLMs at login time, you can register the API Keys for your chosen LLMs via the following command using the Conductor or ISQL command line interfaces:
Command Syntax
OAI.DBA.SET_PROVIDER_KEY('{llm-vendor-tag}', 'api-key')Usage Examples
OAI.DBA.SET_PROVIDER_KEY('openai','sk-svcacct-xxx');
OAI.DBA.SET_PROVIDER_KEY('claude','sk-ant-api03-xxx');
OAI.DBA.SET_PROVIDER_KEY('gemini','AIxxxx');
Most commercial LLM providers have a standard registration process that is automatically handled by the OPAL's setup wizard. For open-source or self-hosted models, additional configuration may be required.
Once an LLM is registered, it can be bound to specific users or roles, allowing you to control who can use which models and for what purposes.
Application Programming Interface (API) Access
Your OPAL instance is also API-accessible, providing functionality for issuing and revoking credentials in the form of:
- Dynamically negotiated OAuth access tokens
- Issued OAuth Credentials and Bearer Tokens
You obtain credentials using the https://{CNAME}:8891/oauth/applications.vsp endpoint, which presents you with the following:
1. Client Applications Landing Page
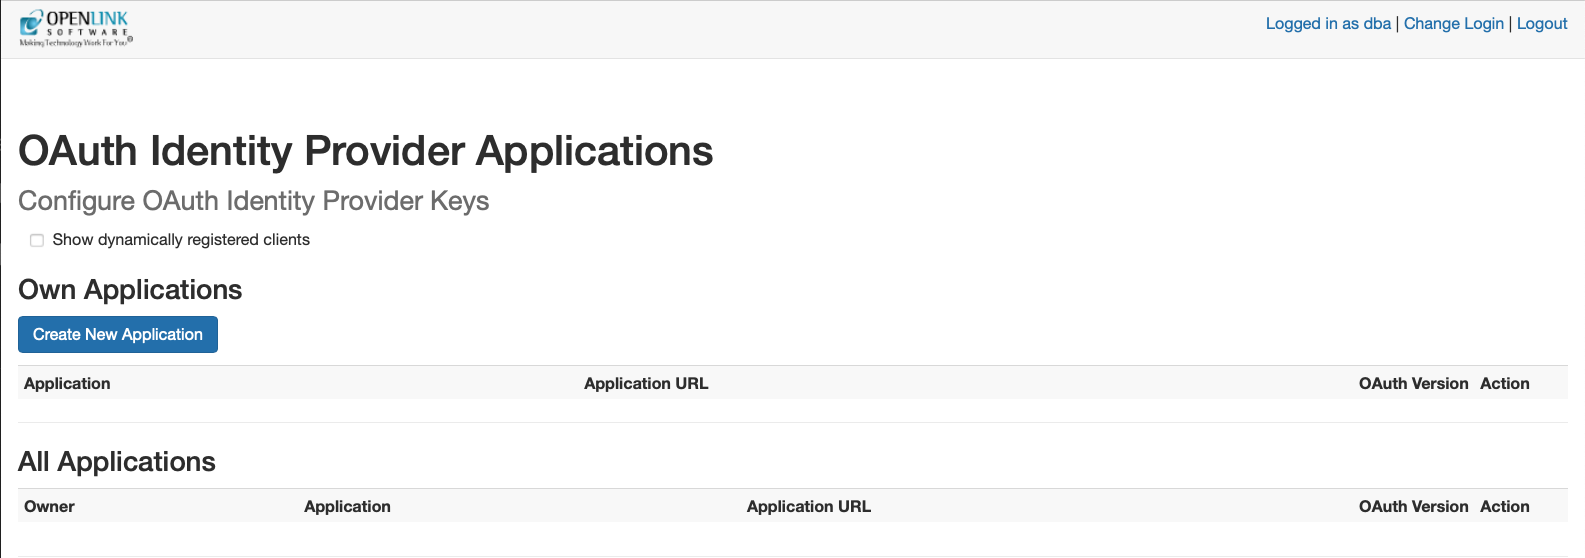
2. Credentials Issue page
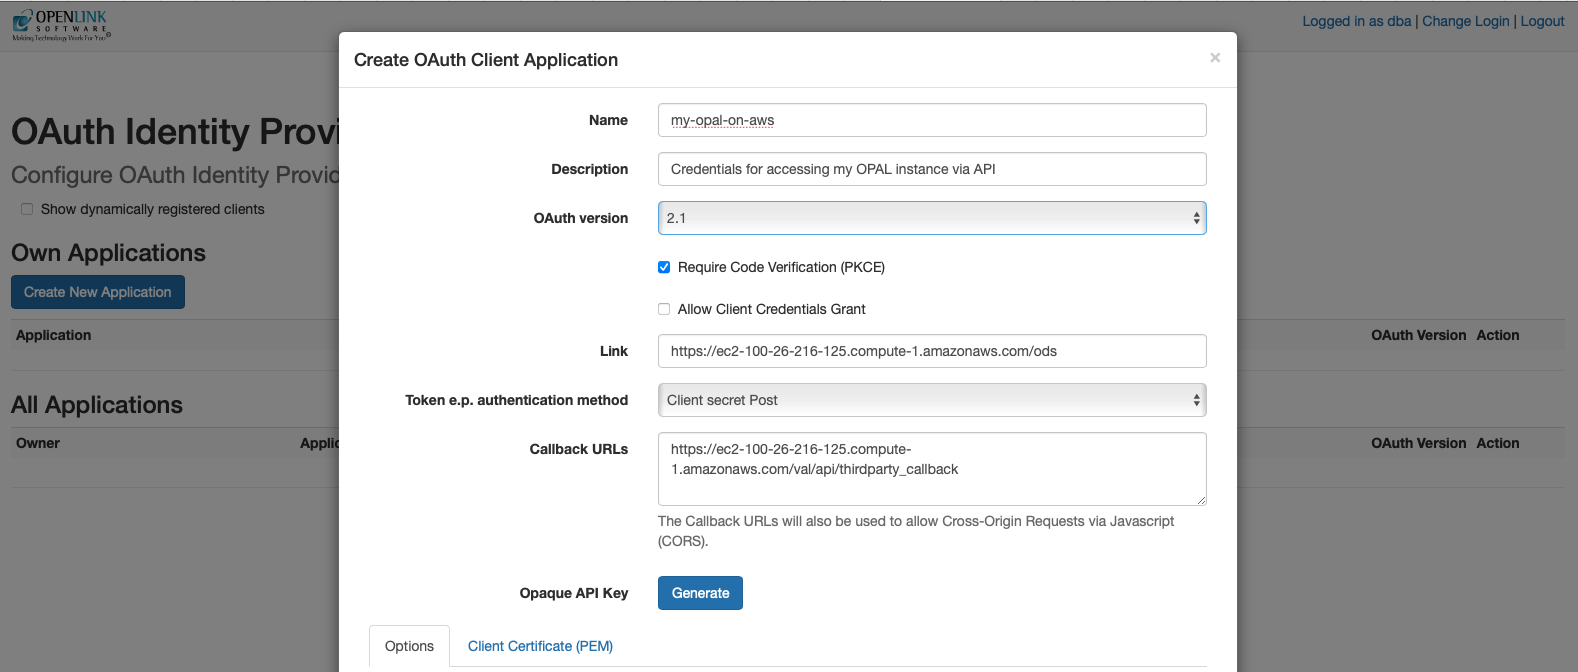
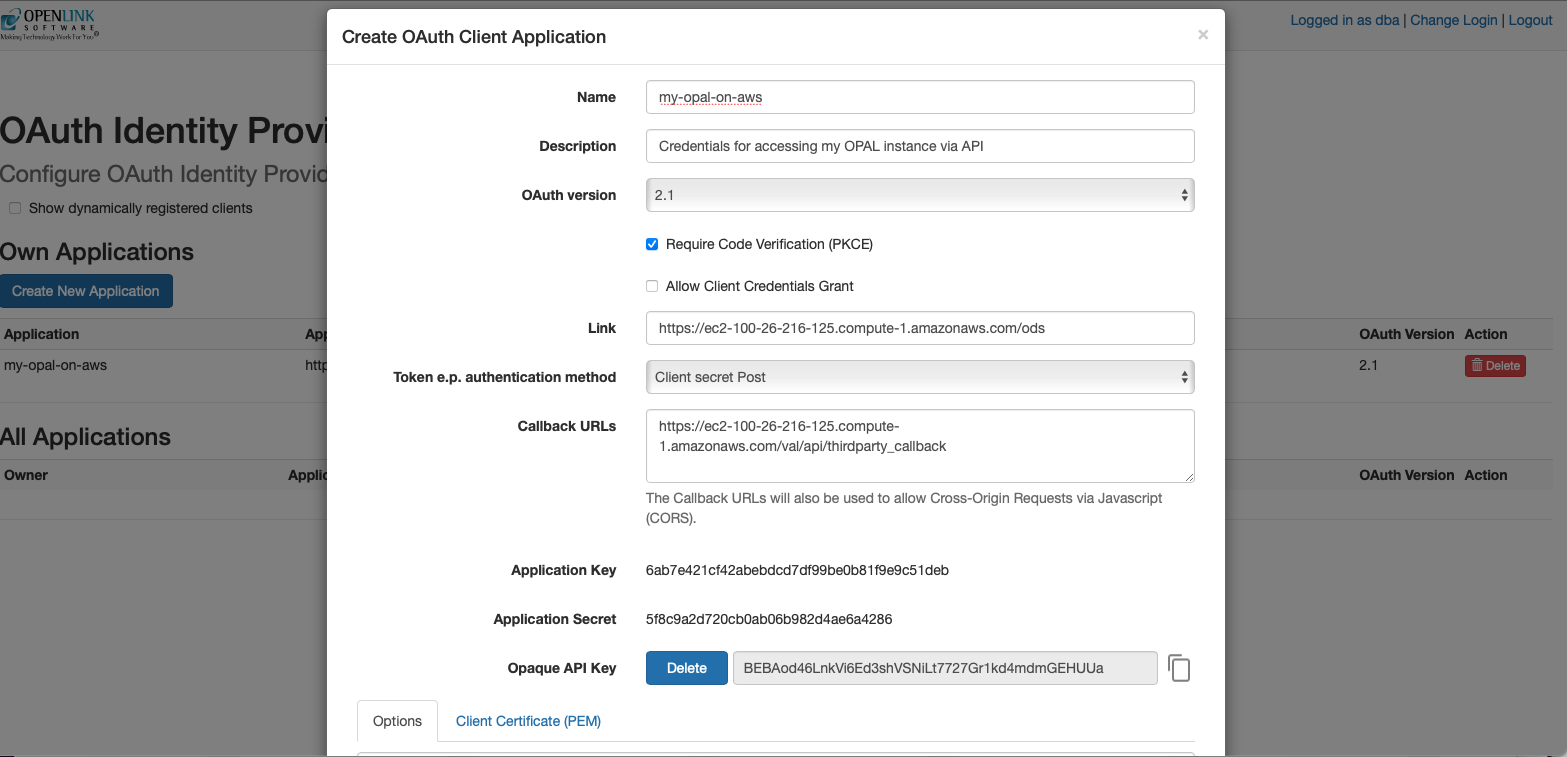
Once your credentials have been generated and copied to a safe location, you are ready for API-based interaction with your instance using protocols such as the Model Context Protocol (MCP) and the Agent-2-Agent (A2A) Protocol.
Model Context Protocol (MCP) Usage
OPAL has built-in MCP support (client and server). Enable this by setting up CORS access for the /.well-known and /OAuth2 virtual directories in the Conductor UI.
MCP Server Endpoints:
The following endpoints are automatically generated for your OPAL instance:
- Streamable HTTP:
https://{CNAME}:8891/chat/mcp/messages - Server-Sent Events:
https://{CNAME}:8891/chat/mcp/sse
Claude Desktop Configuration
Here's the JSON-based MCP Server configuration template for Claude Desktop:
{
    "mcpServers": {
        "{Your-Designated-MCP-Server-Name-For-SSE}": {
            "command": "npx",
            "args": [
                "mcp-remote",
                "https://{CNAME}/chat/mcp/sse"
            ]
        },
        "{Your-Designated-MCP-Server-Name-For-Streamable-HTTP}": {
            "command": "npx",
            "args": [
                "mcp-remote",
                "https://{CNAME}/chat/mcp/messages"
            ]
        }
    }
}Other MCP Interaction Options
The following MCP Servers also offer bridge-based access to your OPAL instance, courtesy of the stdio transport leveraging data access protocols such as ODBC (Open Database Connectivity) for JavaScript/TypeScript runtimes (e.g. node.js), JDBC (Java Database Connectivity) for Java runtimes, Python ODBC (pyODBC) for Python runtimes, and ADO.NET for DotNet runtimes:
Your OPAL instance as an MCP Client
As an MCP client, OPAL can bind to tools published by any MCP Server. You can test this by obtaining an API key from a public endpoint (like https://demo.openlinksw.com/chat/mcp/messages) and registering it in your instance's admin area at https://{CNAME}:8891/chat/admin/.
Agent-2-Agent (A2A) Protocol Usage
A2A support enables sophisticated workflows between AI agents. Agents are discoverable via a JSON-based Agent Card at https://{CNAME}:8891/.well-known/agent.json.
FAQ
General Questions
What is OPAL?
OPAL (OpenLink AI Layer) is an AI-powered platform that provides integration with multiple Large Language Models (LLMs) and supports advanced protocols like MCP and A2A for building AI assistants and agents.
What are the prerequisites for installing OPAL on AWS?
You need an active Amazon Web Services account to launch an OPAL AMI instance from the AWS Marketplace.
What is the default username and how do I get the password?
The default username is dba. To retrieve the password, SSH into your instance and run: sudo cat /opt/virtuoso/database/.initial-password
Which LLM providers are supported?
OPAL supports OpenAI (GPT), Google (Gemini/Gemma), Anthropic (Claude), Microsoft (GPT/Grok/Phi), Perplexity (Sonar), xAI (Grok), Mistral, Alibaba (Qwen), DeepSeek, and Meta (Llama via Groq/Cerebras).
Configuration Questions
Do I need to enter API keys every time I log in?
No, you can register LLM API keys system-wide using the OAI.DBA.SET_PROVIDER_KEY() command to avoid repetitive entry.
How do I secure my OPAL instance?
Use Attribute-based Access Controls (ABAC) by executing SPARQL commands to set up fine-grained access controls that determine who can log in and under what restrictions.
What ports need to be open in my security group?
You need to allow HTTPS (port 443) from source 0.0.0.0/0 in your AWS security group settings.
Do I need a public IP address?
Yes, ensure your instance has a public IP address. If not, use the Elastic IP assignment feature in the EC2 console.
Protocol Questions
What is MCP?
Model Context Protocol (MCP) is a protocol that enables AI applications to securely connect to external data sources and tools, providing standardized access to resources.
What is A2A?
Agent-2-Agent (A2A) Protocol enables communication and coordination between AI agents, allowing them to work together in sophisticated workflows.
Can OPAL work as both an MCP client and server?
Yes, OPAL includes built-in support for MCP as both a client and server, supporting Server Sent Events (SSE) and Streamable HTTP transport options.
Technical Questions
How do I handle SSL certificate issues with MCP Inspector?
Set the environment variable export NODE_TLS_REJECT_UNAUTHORIZED=0 before starting MCP inspector sessions, as OPAL uses self-signed certificates by default.
What virtual directories need CORS access for MCP?
You need to set up CORS access for /.well-known and /OAuth2 virtual directories via the Conductor UI.
How do I register models for providers that don't support API listing?
For providers like Google Gemini that don't offer API listing, use: OAI.DBA.REGISTER_CHAT_MODEL('{llm-vendor-tag}','{llm-name}');
Glossary of Terms
- A2A (Agent-2-Agent Protocol)
- A communication protocol that enables AI agents to interact and coordinate with each other in sophisticated workflows.
- ABAC (Attribute-based Access Control)
- A security model that uses attributes, policies, and environmental conditions to control access to resources.
- ACME Protocol
- Automatic Certificate Management Environment, a protocol for automating domain certificate verification and creation.
- ADO.NET
- A data access technology from Microsoft that provides connectivity between .NET applications and databases.
- Agent Card
- A JSON-based descriptor file that contains information about an AI agent's capabilities, authentication requirements, and available skills.
- AMI (Amazon Machine Image)
- A pre-configured virtual machine image used to create instances in Amazon EC2.
- API (Application Programming Interface)
- A set of protocols and tools for building software applications and enabling communication between different systems.
- Bearer Token
- A security token used for authentication in HTTP requests, typically included in the Authorization header.
- CNAME
- Canonical Name record, a type of DNS record that maps an alias name to the true or canonical domain name.
- CORS (Cross-Origin Resource Sharing)
- A security feature that allows web applications running at one domain to access resources from another domain.
- DBA
- Database Administrator, also refers to the default administrative user account in Virtuoso.
- FOAF (Friend of a Friend)
- An RDF vocabulary for describing people, their activities, and relationships.
- IRI (Internationalized Resource Identifier)
- A generalization of URIs that allows characters from the Universal Character Set.
- iSQL
- Interactive SQL, a command-line interface for executing SQL commands in Virtuoso.
- JDBC (Java Database Connectivity)
- An API for connecting Java applications to databases.
- LLM (Large Language Model)
- AI models trained on large amounts of text data to understand and generate human-like text.
- MCP (Model Context Protocol)
- A protocol that enables AI applications to securely connect to external data sources and tools.
- NetID
- Network identifier used for user authentication and authorization.
- OAuth
- An open standard for access delegation commonly used for authorization.
- ODBC (Open Database Connectivity)
- A standard API for accessing database management systems.
- OPAL (OpenLink AI Layer)
- OpenLink Software's AI platform that integrates multiple LLMs and supports advanced AI protocols.
- OpenAPI
- A specification for describing REST APIs, formerly known as Swagger.
- pyODBC
- A Python library for connecting to databases using ODBC.
- RDF (Resource Description Framework)
- A framework for representing information about resources on the web.
- SPARQL
- A query language and protocol for querying and manipulating RDF data.
- SSE (Server-Sent Events)
- A web standard that allows a server to push data to a web page in real-time.
- SSL (Secure Sockets Layer)
- A security protocol for establishing encrypted connections between clients and servers.
- stdio
- Standard input/output, referring to the default communication channels in computing systems.
- URI (Uniform Resource Identifier)
- A string that identifies a particular resource.
- VAL (Virtuoso Authentication Layer)
- Virtuoso's authentication and authorization framework.
- Virtuoso
- OpenLink Software's universal database management system that supports SQL, RDF, and other data models.
